4. Classes and Objects
Chapter 0100 2
What’s the Point?
-
Understand the basics of object-oriented programming (OOP).
-
Use a class diagram to plan a program.
-
Create a class in accordance with OOP principles.
-
Create a driver class and use objects.
-
Define and use constructors.
-
Understand the role of
staticin Java.
Source code examples from this chapter and associated videos are available on GitHub.
There are multiple ways to organize a program, and the code we’ve written to this point could be described as procedural programming. In procedural programming, we organize our code into methods that perform specific tasks, and we think of a program as a series of tasks that need to be performed in a specific order. This course is all about object-oriented programming (OOP), but I want students to have a handful of basic coding skills before we dive into OOP. In this chapter, we’ll start our transition to OOP by learning about classes and objects, which are the basic building blocks of OOP.
4.1. OOP Basics
Until now, we have been organizing our programs into methods, which is a procedural programming approach. We’ve been thinking of a program as a collection of tasks that need to be performed in a specific order. There’s nothing wrong with this approach, but it can get cumbersome as a program grows in size and complexity—and it isn’t always an intuitive way to plan our programs.
Now we’re ready to start our transition to object-oriented programming (OOP), which lets us think about programs the way we think about the world around us. Instead of thinking about a program as a bunch of tasks, we can think of it as a bunch of objects that interact with each other. As an example, the old-school video game Pac-Man has the main character (an object) moving around a maze (another object), and avoiding four ghosts (yep, four more objects).

If we decide to create Pac-Man, we’ll still be using methods, but they won’t be the basic building blocks of our programs. Instead, we’ll be organizing our programs into classes, which are blueprints—or recipes—for creating objects. A class defines the attributes and behaviors of the objects—and those are the variables and methods we’ll write to create our programs.
Time To Watch!
Intro to OOP: Classes and Objects
4.1.1. Class Diagrams
In OOP, our planning for a program starts by deciding what objects—and therefore, what classes—we’ll need in order to implement the functionality we want. To help organize our thinking, we’ll use a tool called a class diagram, which gives us a visual representation of the classes and their relationships in our program. The format programmers use for class diagrams is called Unified Modeling Language (UML). The UML standards are extensive, and we’ll be using a simplified version in this course.
Consider a program to handle orders at a restaurant. A simple class to represent one person’s order might look like this:
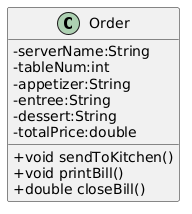
The top section of the diagram has the name of the class, which is Order.
The next section is for the attributes of the class—the information the class will store. This example has attributes for the server’s name, the table number, the items ordered, and the total price.
The bottom section is for the behaviors of the class, which are the actions the class can perform (or that we can do with the class).
With an order, we might send it to the kitchen, print the bill, or close the bill.
We’ll learn more about the symbols and conventions of UML as we go along, but for now the important part is that we can use class diagrams to help us plan our programs—and to talk about OOP concepts without bogging down on code details.
| Your Canvas course includes access to Lucid (Whiteboard), which is an online tool you can use to create UML diagrams. If you create your account through the link in the left-hand navbar in Canvas, you’ll have access to the premium features for free. |
4.1.2. Encapsulation
Object-oriented programming is all about creating objects that can interact with each other.
Since the objects will be interacting, we need to think about how to keep them from interfering with each other in ways we don’t want.
If we have an Order class in a program used by a restaurant, we don’t want some other class to change attributes in a way that disrupts the program—like changing the entree selection to something that’s not on the menu, or setting the price to a negative number, for example.
To prevent this kind of tampering, whether it’s intentional or accidental, OOP relies on a concept called encapsulation. Encapsulation of a class means that attributes are hidden from the outside world, and only the behaviors of the class can access and change them. Continuing with food service analogies, consider the counter at a fast food restaurant. We can’t just reach over and grab a handful of fries; we have to ask the employee behind the counter to get them for us. In this analogy, the food is encapsulated and we can only access it by using a behavior, like "order food" (which would work with the employee).
Another way to think of encapsulation is the way we interact with other people in social situations. When we encounter a stranger, they don’t automatically know our name and phone number; they have to ask us for that information. We’ve encapsulated our personal information, and we only share it when and how we choose to.
In Java, encapsulation is not a strict technical requirement, and our code will still work if we don’t use it. But it’s a best practice—and an important one—so we will encapsulate all of our classes in this course. In fact, I would argue that if we don’t encapsulate our classes, we’re not really doing object-oriented programming. And that’s what we’re here to learn.
4.2. Defining a Class
We’ll look at a hypothetical program to keep rudimentary data about a song’s sales and chart performance; for a single song’s data, we’ll have a class called SongData.
WeatherRecord classTo implement this class in code, we’ll start with a class header. The class header always follows the same pattern: an access modifier, the keyword class, and the name of the class.
The class header is followed by a code block, enclosed in curly braces.
WeatherRecord class.1
2
3
4
5
public class WeatherRecord {
// class code goes here
}
- Access modifier
-
The
publickeyword means that the class can be accessed from any other class. Though this is technically optional, we should always includepublicfor now. classkeyword-
The keyword that tells Java we’re defining a class. It’s required so that the compiler knows what it’s processing. We’ll eventually be able to create different kinds of classes and OOP structures, but for now we’re just creating regular classes.
- Class name (or identifier)
-
The name of the class, which should be a noun that describes the object the class represents—and is singular, so there’s no s at the end. The identifier should start with a capital letter, with the first letter of each word capitalized (like
WeatherRecord). This is similar to the camelCase naming convention we’ve been using for variables and methods; it’s called PascalCase.
The class code block is where we define the different components that make up the class, which we call the instance members. To begin with, we’ll focus on two types of instance members: fields and methods.
4.3. Fields
Fields are the implementation of the attributes of the class.
They are also known as instance variables because they are similar to the variables we’ve been using in our programs, but their scope is the object created from the class, not the method where they’re defined.
A field is unique to the object; if we make two objects from our WeatherRecord class, each object will have its own date, high temperature, and average temperature.
Fields are declared like our other variables, but they are encapsulated using the private access modifier.
This means that the fields can only be accessed and changed by the methods of the class, not by other classes—which controls how the data is used and prevents accidental or invalid changes.
Since a class will compile and run even if we leave off the private access modifier, it’s easy to forget to use it. But don’t worry, I’ll help you remember by taking huge points off your assignments if you don’t make your fields private. As I’ve mentioned, you’re not really doing OOP if you don’t encapsulate your fields, and we’re learning OOP here.
|
WeatherRecord class.1
2
3
4
5
public class WeatherRecord {
private String date;
private int highTemp;
private int avgTemp;
}
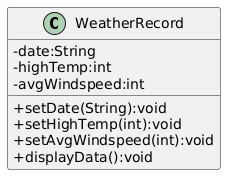
In our original class diagram, we indicated that the fields were private by placing a - in front of the field name.

You might remember from the section on variable scope in Chapter 3 that using global variables is terrible, and every time we create a global variable, a puppy loses its favorite toy.
And these fields look an awful lot like global variables.
But fields in a class are not global variables; they’re instance variables—and that’s a good thing.
The fields are encapsulated with that private keyword, so they can only be accessed and changed by the methods of the class—which is also good thing.
And the fields are unique to each object, so we can have multiple objects with different values for the fields—which is yet another a good thing.
And so no puppies' toys will be harmed as long as we use that private keyword.
Time To Watch!
Designing an OOP Class
4.4. Methods
Ensuring that our fields are private is the first step in encapsulating our class, but it’s not the only step.
We also need to create methods that can access and change the fields appropriately—otherwise, the fields are not very useful.
So far, our methods have included the keyword static; we’ll learn more about that shortly, but when we make methods for an OOP class, we’ll leave off that static keyword.
These nonstatic methods are called instance methods, and they are otherwise very similar to the static methods we’ve been using.
For now, our instance methods will be public so they can be accessed from other classes.
Remember, the foundation of encapsulation is having private fields and public methods to permit interactions with that data.
In broad terms, we can categorize instance methods into two types: accessor methods and mutator methods.
4.4.1. Accessor Methods
Accessor methods give access to the fields of the class, but they don’t change the fields.
Think of them as "read only" methods, and often all they do is return the value of a field.
Java naming conventions specify that accessor methods should start with get and then the name of the field they access, formatted in camelCase.
Because of that convention, another name for accessor methods is getters.
WeatherRecord class.1
2
3
public int getHighTemperature() {
return this.highTemperature;
}
The return type of an accessor method is the same as the type of the field it accesses; in this case highTemperature is an int, so the return type of our getter is int.
By prefixing the field name with this., we make it clear that we’re referring to a field and not a local variable. More on this later. For now, know that it’s optional, but recommended.
|
A getter allows other classes to be able to read the value of a field; if they don’t need to know the value, we just don’t write a getter for that field. But read-only access usually does no harm, so often we’ll have getters for all of our fields.
WeatherRecord class. 1
2
3
4
5
6
7
8
9
10
11
12
13
14
15
16
17
18
public class WeatherRecord {
private String date;
private int highTemp;
private int avgTemp;
public String getDate() {
return this.date;
}
public int getHighTemp() {
return this.highTemp;
}
public int getAvgTemp() {
return this.avgTemp;
}
}
4.4.2. Mutator Methods
Mutator methods change the fields of the class.
Though they sometimes return a value, their primary purpose is to change the value of a field, so they usually have a void return type.
As we’re getting the hang of this OOP thing, we’ll create a lot of mutator methods that are just setters—methods that set the value of a field.
The naming convention for setters is to start with set and then the name of the field they change, formatted in camelCase; they usually have a void return type.
WeatherRecord class.1
2
3
public void setHighTemperature(int temp) {
this.highTemperature = temp;
}
The parameter of a setter is the same type as the field it changes; in this case highTemperature is an int, so the parameter of our setter is also an int.
All this method does is accept a new value and assign it to the field.
Choosing to write setters isn’t quite as straightforward as with getters, where there’s generally no harm in exposing read-only access to everything. But we really should only write setters for fields that we want to be able to change from outside the class.
| A rule of thumb for beginners: create getters for all of your fields when you first write your class, and then add setters only as you need them. Because this is sometimes tricky for beginners to determine, I generally don’t deduct points for writing unnecessary setters—but sometimes my directions will explicitly tell you not to write a setter for a field, and I do deduct in that case. |
If you’re paying attention to what we’re doing here, you might be thinking that these setters really just give public access to the fields, which seems to go against the whole idea of encapsulation—anyone can use the setter to mess up the field’s value.
That’s true for now, but only because we don’t know enough Java yet to do anything about it.
As we learn more, we’ll be able to write more complex methods that can control how fields are changed—for example, we can check the new value to make sure it’s valid and won’t break anything.
But for now, this is just another one of those frustrating rules that you just have to follow until you know enough to understand it.
Sometimes mutator methods don’t follow the exact pattern and purpose of setters (simply setting a field’s value).
For example, a method might perform a series of calculations and changes to multiple fields, or it might change a field based on the value of another field.
These methods are still mutators, and we might even still refer to them as setters, but they don’t always follow the setFieldName naming convention.
4.5. The this Keyword
Notice that we’ve been prefixing the field names with this. in our methods.
this is a Java keyword that refers to the current instance.
When we use this. in a method, we’re telling Java that we want to refer to the field of the current object, not a local variable with the same name.
Why would we need to do this?
As long as the compiler can unambiguously determine which variable an identifier refers to, we don’t need to use this.
In other words, if my parameter has a unique name, the compiler won’t get confused.
But it’s common for programmers to use the same name for a parameter as the field it refers to:
1
2
3
4
5
private int highTemperature;
public void setHighTemperature(int highTemperature) {
highTemperature = highTemperature; (1)
}
| 1 | Ambiguous identifier references. |
You can see that this is visually confusing, and it also violates guidance I gave you when we learned about variable scope.
In this case, the parameter is a local variable to the setHighTemperature() method, and it’s shadowing the field.
Unless we tell it otherwise, the compiler will use the local variable any time it sees highTemperature; that means the assignment statement looks up the value of the highTemperature parameter, and then assigns that value to…the highTemperature parameter.
In other words, it’s a line of code that does nothing but waste the computer’s time.
To avoid this, we can just give our parameters different identifiers, and I tend to recommend that on the first few classes you create.
But it is common to see parameters with the same name as the field they refer to, so we need another solution.
The solution is the this keyword, which tells the compiler when we are referring to the field.
this to clarify an ambiguous identifier.1
2
3
4
5
private int highTemperature;
public void setHighTemperature(int highTemperature) {
this.highTemperature = highTemperature; (1)
}
| 1 | The this keyword clarifies that we’re assigning the value in the parameter to the field. |
Outside of this kind of shadowing situation, the this keyword is optional.
In fact, there’s a nerdy debate about whether programmers should use this. in all cases or only when it’s necessary to clarify which variable we’re referring to.
I recommend that new programmers just get in the habit of using it from the start.
4.6. Validating Data in a Setter
The setters we’ve seen to this point don’t actually do anything other than set the value of a field to whatever is passed to them.
In other words, they are no different than making the fields public—which, as we’ve learned, is a bad practice.
We can improve our setters by adding some code to validate the data before changing the field. Data validation is the process of ensuring that the data being used is correct and appropriate. In the context of a setter, we can make sure that the new value being passed to the setter meets certain criteria before we assign it to the field.
In our WeatherRecord class, we have a field for the average wind speed for the day.
It’s not possible to have a negative wind speed, so we should make sure that the value being passed to the setter is zero or greater before assigning it to the field.
public void setAverageWindSpeed(double averageWindSpeed) {
    if (averageWindSpeed >= 0) {
        this.averageWindSpeed = averageWindSpeed;
    }
}
In this example, the setter checks if the new averageWindSpeed value is zero or greater before assigning it to the field.
If the value is below zero, the setter just does nothing—which is a simple way to handle invalid data.
We’ll eventually learn more sophisticated ways to handle invalid data, but for now this is sufficient.
4.7. Fully Defined WeatherRecord Class
Here’s how the WeatherRecord class looks with the setters added, and using this. to indicate when we’re referring to a field.
WeatherRecord class, this. added to field names, and comments identifying the parts. 1
2
3
4
5
6
7
8
9
10
11
12
13
14
15
16
17
18
19
20
21
22
23
24
25
26
27
28
29
30
31
32
33
34
public class WeatherRecord {
// Fields
private String date;
private int highTemperature;
private double averageWindSpeed;
// Getters
public String getDate() {
return this.date;
}
public int getHighTemperature() {
return this.highTemperature;
}
public double getAverageWindSpeed() {
return this.averageWindSpeed;
}
// Setters and Mutators
public void setDate(String date) {
this.date = date;
}
public void setHighTemperature(int highTemperature) {
this.highTemperature = highTemperature;
}
public void setAverageWindSpeed(double averageWindSpeed) {
if (averageWindSpeed >= 0) {
this.averageWindSpeed = averageWindSpeed;
}
}
}
4.8. Using a Class
As we’ve learned, defining a class establishes a blueprint; to make use of a class in a program, we need to use that blueprint to create an object. We can as many objects from a class as we need, and each object is known as an instance of the class. And creating an instance is called instantiating a class.
To create our first objects, we use the same two steps we’ve been using to create variables: a declaration statement and an assignment statement. The declaration is still a data type and an _identifier, but in this case the data type is the name of the class:
1WeatherRecord day1;
This creates a variable called day1 that will point to—or reference—the memory location where our object will be stored.
The identifier follows the same rules we learned for primitive variables: a descriptive name typed in camelCase (with a lowercase first letter).
In this case, the day1 object is going to maintain the record for the first day of our weather tracking.
The assignment statement works the same, but what we’re assigning looks a lot different.
We’ll use the new keyword to allocate memory, and then we’ll call a constructor.
1
2
WeatherRecord day1;
day1 = new WeatherRecord();
We’re soon going to spend some time learning about constructors, but here is the takeaway for now: the identifier is exactly the same as the class name (case-sensitive!), and it’s followed by parentheses.
| We’ve already learned that parentheses in Java usually means we’re referring to a method. A constructor is a special method called when instantiating an object. |
Just like with variables, we often combine the declaration and assignment statements into one line of code:
WeatherRecord day1 = new WeatherRecord();Now that we have an object, we can call its instance methods using dot notation, which means we put the object name (not the class name!), followed by a dot, followed by the method call:
1
2
3
WeatherRecord day1 = new WeatherRecord();
day1.setHighTemperature(87);
System.out.println("High temperature on day 1:" + day1.getHighTemperature());
In this example, we’re setting the highTemperature field of day1 to 87 degrees, and then we’re retrieving the high temperature and outputting the returned value.
This is a good test of the set and get methods for the highTemperature field.
It’s easy for beginners to forget to use that dot notation. To see why it’s necessary, consider the following example.
1
2
3
4
WeatherRecord day1 = new WeatherRecord();
WeatherRecord day2 = new WeatherRecord();
setHighTemperature(87); // This won't compile!
In order to set a high temperature, the compiler needs to know which object we’re referring to: day1 or day2.
The dot notation lets us specify the object we want to use; and even if we only have one object, that object still needs to be specified with dot notation so the compiler knows where to find the method.
1
2
3
4
5
WeatherRecord day1 = new WeatherRecord();
WeatherRecord day2 = new WeatherRecord();
day1.setHighTemperature(87);
day2.setHighTemperature(75);
4.8.1. Object Classes vs. Driver Classes
Ok, time for another convention that seems only intended to be nitpicky and pointless, but is important and is expected on assignments in this course.
OOP nerds value keeping the different parts of our programs compartmentalized, and that includes separating the class definition from the code that uses the class.
A class definition goes in its own file, which must have a filename exactly match the name of the class (with .java as the extension)—and that one’s not a convention, that’s a syntax rule for the compiler.
A class we define for use as object can be called an object class or a user-defined class (where the "user" in this case is the programmer).
The code that uses the object class should be in its own file, and is often called a driver class.
The driver class contains the main() method, which is the entry point for the program.
A driver class actually goes by several different names.
Some people call it a main class because, well, it’s the class with the main() method; I don’t hear that term a lot, but it is out there.
I often use the terms demo class or test class because, as learners, we’re often making a class just to try a specific concept or skill, and the only thing our program really does is show that the object class is working.
And in those cases, we often use "test" or "demo" in the name; so a driver class for our WeatherRecord object class might be called WeatherRecordDemo or TestWeatherRecord, or something similar.
The point here is that, if we’ve created an object class called WeatherRecord, we’re not going to put our main() method in that same class/file.
We’re going to make a separate class—a driver, or demo class, or test class, or whatever the hell you want to call it.
I don’t much care what term you use, as long as it’s a separate class and file.
Your pitchforks are already sharpened, but here’s the part where you light your torches.
All of your input and output should be in the driver class.
That is, you generally shouldn’t have any print() or println() statements, any dialog popups (if you know how to use JOptionPane or similar), or any Scanner input calls in your object classes.
My examples always enforce this separation of concerns, so you’ll see plenty of examples of what I mean.
So, why can’t we put input/output in our object classes?
-
To "decouple" the UI from the business logic or guts of our program. This makes our code reusable in a variety of projects, such as web pages, mobile apps, and GUI applications—none of which are friendly to console input and output. Look up the terms MVC and MVVM for all kinds of information about that if you think your professor is just a crank and you want to know what happens in the real world. Spoiler alert, the real world generally wants them kept separate, too.
Incidentally, we can use the term portability to describe this quality, since we can move our well-designed code to other projects and contexts easily.
-
To keep our code more readable by keeping the different parts clearly identifiable and easy to find.
-
Because I just don’t care much about input and output. I care about the classes you create, so I want to look at (and grade) that work separately. If your input and output don’t work but your object class looks good, you’re still going to get a good grade—but I can only do that if I’m able to separate out those mistakes.
Unfortunately, this is one of those things that boils down to, "because I said so" and "you’ll thank me later." Sorry, I can’t do much better than that for now.
WeatherRecord class. 1
2
3
4
5
6
7
8
9
10
11
12
13
14
15
16
17
18
19
20
21
22
23
24
25
26
27
public class WeatherRecordDemo {
public static void main(String[] args) {
// Instantiate two objects
WeatherRecord day1 = new WeatherRecord();
WeatherRecord day2 = new WeatherRecord();
// Set field values for both instances
day1.setDate("2024-10-01");
day1.setHighTemperature(87);
day1.setAverageWindSpeed(1.5);
day2.setDate("2024-10-02");
day2.setHighTemperature(75);
day2.setAverageWindSpeed(8.25);
// Output field values for both instances
System.out.println("Date: " + day1.getDate());
System.out.println("High Temperature: " + day1.getHighTemperature());
System.out.println("Average Wind Speed: " + day1.getAverageWindSpeed());
System.out.println("------------------------------");
System.out.println("Date: " + day2.getDate());
System.out.println("High Temperature: " + day2.getHighTemperature());
System.out.println("Average Wind Speed: " + day2.getAverageWindSpeed());
}
}
The driver class above creates two instances of the WeatherRecord class, uses each setter, then outputs the return from each getter.
This ensures/demonstrates that instance variables are independent of each other and all instance methods work correctly.
In general, I ask students to create at least two instances of each class they are demonstrating.
Time To Watch!
Implementing and Using a Class in Java
Files from video:
-
Completed code:
CellCustomer.java -
Completed code:
CellCustomerDemo.java
Take It for a Spin
This is a good time to stop and try out what you’ve learned so far. The Coding Practice assignment for this chapter can be completed with the concepts covered to this point.
4.9. Constructors
When we instantiate a new object, the syntax includes an assignment statement with the new keyword and a call to a method:
WeatherRecord day1 = new WeatherRecord();
But what the heck is that WeatherRecord() method—we never created that!
This is a call to a special method called a constructor.
A constructor runs when an object is instantiated, and it’s used to set up the object with any initial values or behaviors.
A constructor’s primary job is to initialize the fields of the object—to give each instance variable a value.
If we don’t write a constructor, the compiler will create one for us; it’s called a default constructor, and it will set all fields to their default values.
Numeric fields like int and double will be set to zero, and String fields (as well as any other objects) will be set to null.
We’ve been using setters to change those initial values to what we want, but we can also write our own constructors to set those values when the object is created.
Constructors are a special kind of method, so their syntax is a little different from other methods.
A constructor is always public, it has no return type (not even void), and its name is the same as the class name.
A definition for a constructor for the WeatherRecord class would look like this:
WeatherRecord class.1
2
3
public WeatherRecord() {
// code to initialize fields goes here
}
The most important job of a constructor is setting values for each field of the object. As a beginner, our rule of thumb is to just make a simple assignment statement for each field.
WeatherRecord constructor that initializes all three fields.1
2
3
4
5
public WeatherRecord() {
this.date = "2025-01-01";
this.highTemperature = 0;
this.averageWindSpeed = 0.0;
}
Since our WeatherRecord class has three fields, we’ve got three assignment statements in our constructor.
We can initialize those fields to any value we want, but we should choose values that make sense for the object; whatever we put there will be the default values that each object gets when it is instantiated.
Constructors should be placed after the fields but before the getter and setter methods.
| This kind of constructor is called a parameterless constructor because, well, it doesn’t have any parameters in the parentheses. It’s technically not a default constructor, because we wrote it ourselves rather than letting the compiler do it, but most programmers aren’t as nerdy about word choice as I am, so the term "default constructor" is used more often than parameterless constructor. |
Constructors can also have parameters, which allows us to pass values to the constructor when we instantiate an object. This is useful when we want to set the initial values of the fields to something specific, rather than the default values. We add parameters to our constructor just like we do with any other method, by listing the data types and identifiers in the parentheses.
WeatherRecord constructor with parameters.1
2
3
4
5
public WeatherRecord(String date) {
this.date = date;
this.highTemperature = 0;
this.averageWindSpeed = 0.0;
}
To use this constructor, we pass a String value when we instantiate the object:
WeatherRecord day1 = new WeatherRecord("1998-01-25");
There are a couple of important things to note about this example:
-
This constructor only has one parameter but it still has three assignment statements. All fields need values, so if we don’t have a parameter to get a field’s value, we need to set it to a default value.
-
The parameter has the same name as the field:
date. This shadowing similar to what we saw with setter methods, so we have to make sure we usethis.to clarify which one is the field.
We can also overload constructors, which means we can have multiple constructors with different parameters—just like we can with any other method. That can include having a parameterless constructor and one or more constructors with parameters, or having multiple constructors with different numbers of parameters.
To see complete examples of the WeatherRecord class with constructors, fields, and methods, as well as a driver class to demonstrate the different features, visit the GitHub repository for this chapter.
|
Time To Watch!
Constructors in Java
Files from video:
-
Completed code:
MobileCustomer.java -
Completed code:
MobileCustomerDemo.java
4.9.1. Constructors and Encapsulation
Constructors allow us to be stricter with our encapsulation since now we don’t have to have setters to put data into our objects. We can provide a constructor to accept all the data the object needs, decide if we give access to change a field after the object has been instantiated.
For example, if we’re making a bank account object, we’d need to provide an account number when we create the account, but we probably shouldn’t allow the account number to be changed after the account is created. In that case, our constructor would accept the account number, but we wouldn’t provide a setter for the account number.
4.10. static Constants and Methods
Since our first "Hello World" program, we’ve been using the static keyword to create methods—beginning with the main() method that is the starting point for every Java program.
However, we haven’t had enough context to understand what that keyword means.
So far, out classes have focus on instance members, which are the fields and methods that belong to an object.
Fields are instance members, which means that each object has its own copy of the field that can be changed without affecting other objects.
Instance methods are the code that an object can run, and they can access and change the fields of the object.
Instance members are defined without using the static keyword, so we refer to them as nonstatic members.
When we use the static keyword, we’re creating a class member—a field or method that belongs to the class itself, not to any object created from the class.
Put another way, a class member is shared by all objects created from the class, and it can be accessed without creating an object.
System is a class that includes the print() and println() methods we’ve been using, and we can think of those methods as static.
Since they’re static (sort of), we can call them without creating a System object:
System.out.println("Hello, World!");If println() was an instance method (without the static keyword), we’d have to create a System object before we could call it:
System mySystem = new System();
mySystem.println("Hello, World!");
That would be a pain, so we’re glad that we can think of println() as static.
Technically, System.out is an object of the PrintStream class, and println() is a method of that object—but you don’t need to worry about that yet. You don’t need to know that right now, but if I don’t mention it then somebody will claim I’m an idiot. I probably am an idiot, but not for this reason.
|
As our skills develop, we’ll learn more about using static in our programs and classes, but an important one to know about for now is the static constant.
When we put a static constant in an object class (which would also use the keyword final), we’re defining a value that is shared by all objects created from the class.
If we have a savings account class, a common example when learning OOP, we might have a static final double INTEREST_RATE constant.
This would mean that every savings account would earn the same interest rate, which is often how banks work.
static constant. 1
2
3
4
5
6
7
8
9
10
public class SavingsAccount {
private static final double INTEREST_RATE = 0.02;
// other fields and methods go here. See SavingsAccount.java in the repository for the complete code.
public void addInterest() {
balance += balance * INTEREST_RATE;
}
}
In this example, the INTEREST_RATE is declared as private, so it can’t be accessed from outside the class—but it can be accessed by any object created from the class.
A constant can also be declared as public, which would allow other classes to access it.
As an example, the Math class has a PI constant that is defined as follows:
PI constant in the Math class.public static final double PI = 3.141592653589793;To use this in a program, we can call it just like we call println()—without creating an object:
double area = Math.PI * radius * radius;Check Yourself Before You Wreck Yourself (on the assignments)
Chapter Review Questions
Note: These questions were created with the assistance of generative AI.
Sample answers provided in the Liner Notes.